|
During my long-term substitute position at Wacoochee Elementary, I spent a little bit of time teaching students about the earth's layers. We read informational texts about Earth and its different layers, watched videos that both showed us the layers and explained them to us, created a KWL chart to ask questions and keep track of what we learned, and made a flip book which you can find on TeachersPayTeachers below. After spending several days learning all about the Earth's Layers, we then made a craft where we had to identify the different layers and then paint them the appropriate color. It was so much fun! Here is the final product: 
0 Comments
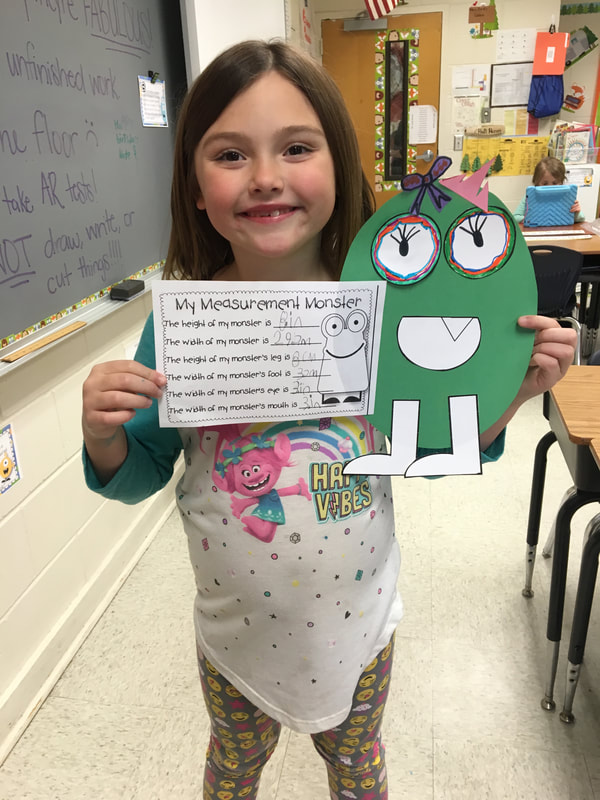
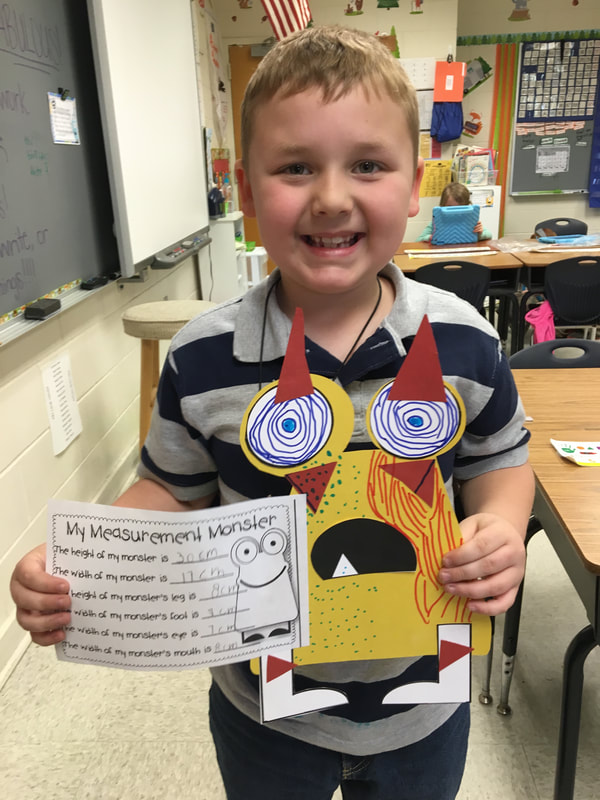
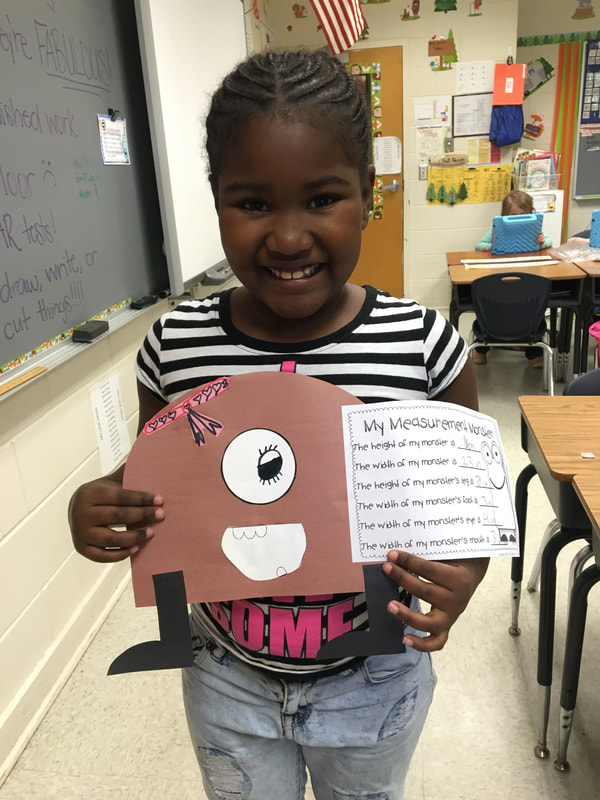
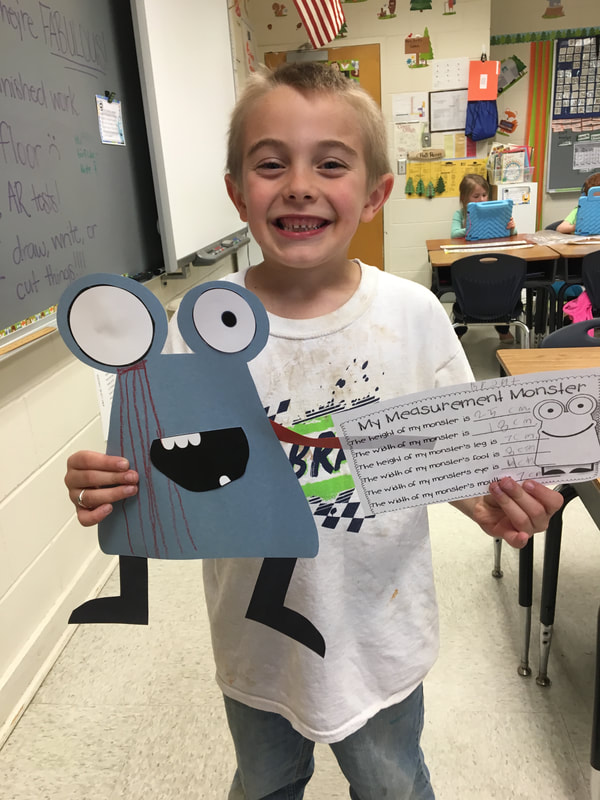
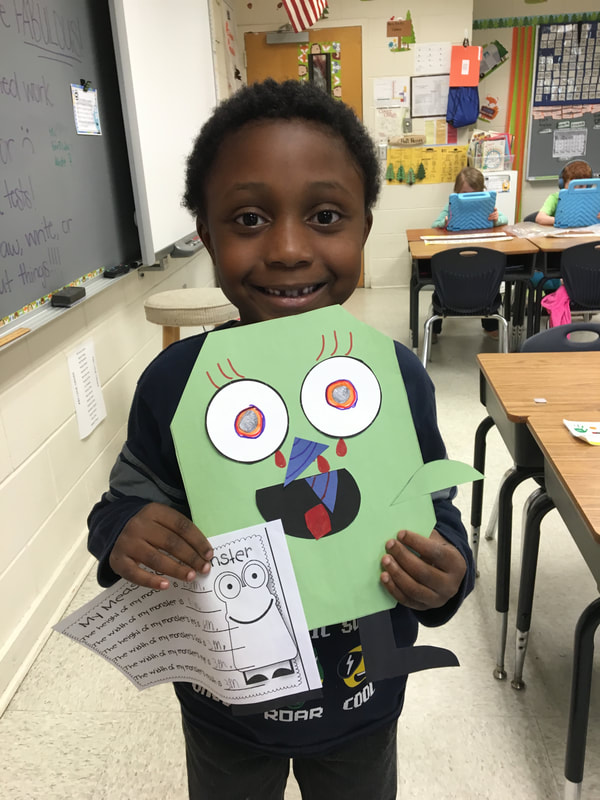
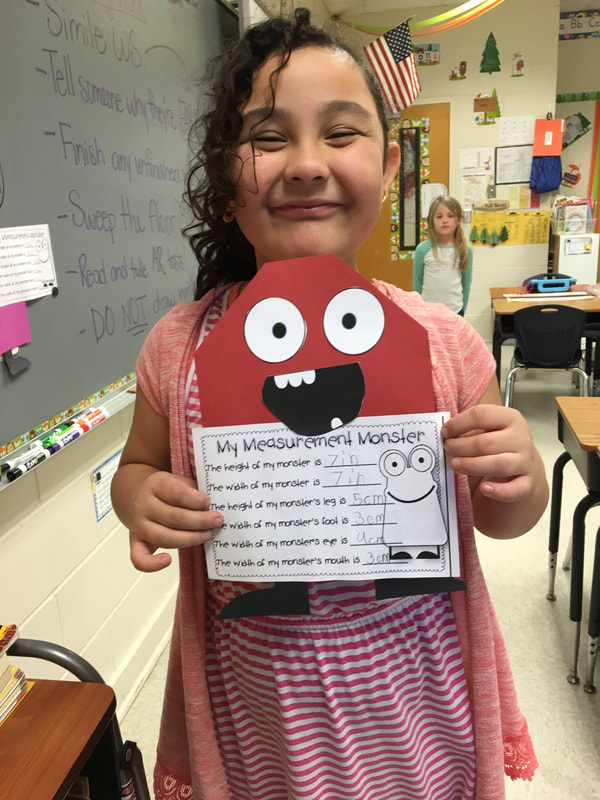
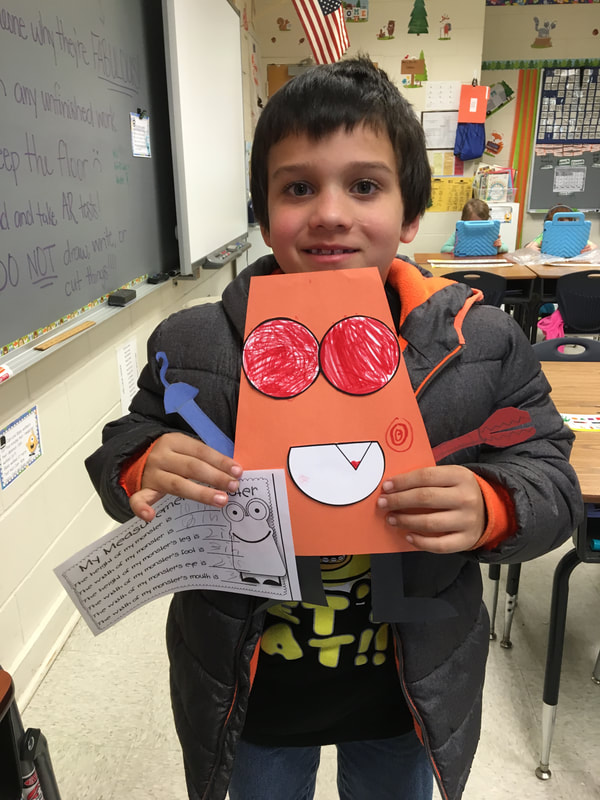
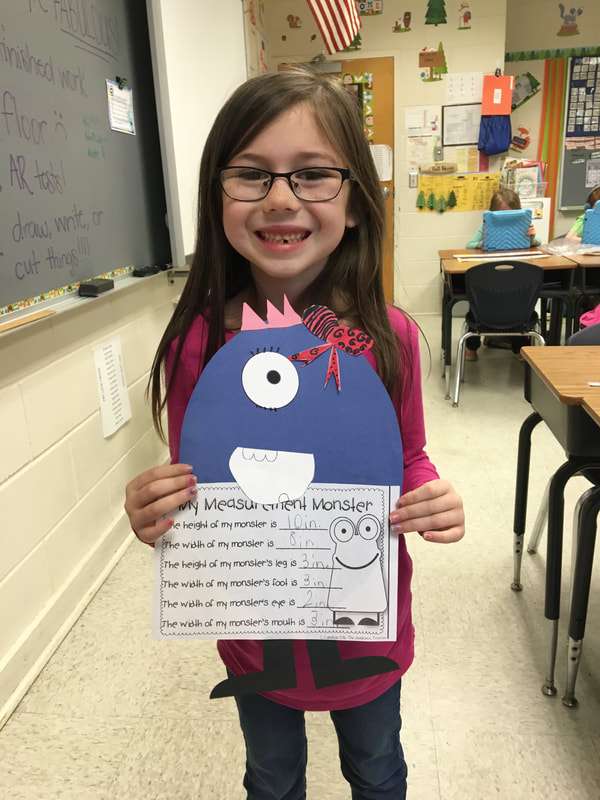
When teaching measurement, I used this AMAZING packet from TeachersPayTeachers to supplement our lessons and to add fun activities to the unit, called Monster Measurement. I'm attaching it below, because it was a purchase that was well worth it! The kids loved it! In this packet you will find nonstandard measurement pages, flip-books comparing 1 inch, 6 inches, & 1 foot and comparing centimeters to meters that can be used for student exploration in the classroom, task cards with monsters for students to measure in centers for both inches and centimeters, worksheets of monsters for students to measure in inches and centimeters, cards to post around the room on objects for students to find, measure and record, word problems that vary in difficulty to meet all students' needs, and SO MUCH MORE! I can't even begin to explain how beneficial this was! I loved that using this in addition to other activities and lessons helped to keep an overall theme to our measurement unit. While we used resources from the textbook, internet, and hands-on manipulatives, having these monster activities to layer in made learning about measurement so much more fun! The packet also comes with a final activity where students make THEIR OWN measurement monsters!!!!! They then have to measure all of the parts of their monster. I used the final project as an assessment to see if my students were ready to begin reviewing for their test. The kids were so creative with it, so it was easily one of the best things that we did! Here are some of our MEASUREMENT MONSTERS!
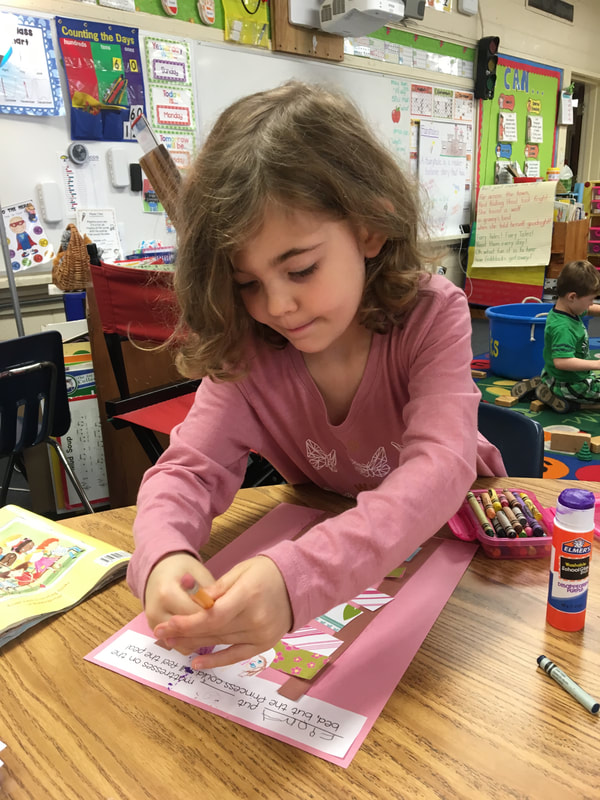
Valentine's Day was during my first week of my long-term substitute position at Wacoochee Elementary. We had a lot of fun with the holiday! Parents came for students to read poems that they wrote themselves, we made heart crafts and writing activities, passed out Valentines, and we did a small math activity to help introduce measurement! The worksheet had students measure with nonstandard units, hearts! Students had previously had a few exposures to measurement and we would soon get into a lot of the details, such as making sure to line up units or rulers at the end (or the zero) and straight against whatever they were measuring. We would use a variety of nonstandard units in the future and even make our own rulers, but this was such a fun way to get the class excited for measurement while having something meaningful, yet Valentine's Day themed, to do on the holiday! I was also able to use this activity as a good starting point to know where students were at with the basics of accurately measuring objects. I walked around the room, engaging with students and taking anecdotal notes, so I would have a better idea of where the majority of the class was in reference to measurement. Below are some pictures of this activity!
 This is going to be a quick one but.... it's time to talk about ANCHOR CHARTS! An anchor chart is a tool for both students and teachers to use to support instruction. They are a visual guideline for students to refer to as they continue to learn about a topic and may need to be able to reference something as a gentle reminder. Anchor charts are wonderful because they visually show what you are trying to explain! A lot of students are visual learners so rely on having pictures. In my kindergarten internship classroom, there was one student who was an English Language Learner and spoke almost NO English whatsoever at the beginning of the year. As the year went on, he still very rarely spoke and only used a few words here or there to communicate. He was very bright, however, and could utilize things posted all over the room to help him match capital and lowercase letters, identify words that begin with certain letters or sounds, figure out what color he needed to color something on a black-and-white worksheet, etc. Here are a few examples of just a couple of anchor charts that I made throughout my internship and long-term substitute position. These were for short vowel sounds!      One of my FAVORITE things that I got to do with my sweet kindergarteners was to teach sequencing and story elements! I taught sequencing and story elements before introducing the Venn Diagram and what it means to compare and contrast. Why I Started With Sequencing... I chose to teach sequencing first because to me it just made sense! You need to understand the importance of putting things in the correct order to be able to identify story elements like the beginning, middle, and end of a story. Understanding the sequence of events also helps you to better retell stories! We used simple short stories and familiar fairy tale stories to practice sequencing. We also used pictures of things like making a sandwich, getting ready in the morning, and our classroom routines to help us understand sequencing! Once we knew sequencing and good transition words to use to describe the order in which events happen (first, next, & last), we were ready to dive into our story elements unit with FAIRYTALES! A couple of the sequencing activities that I used are available on my TeachersPayTeachers! You can click below to access those! Why I Transitioned from Sequencing to Plot and then Story Elements... I went straight from sequencing to plot (a story's beginning, middle, & end) because I could easily explain that the first, next, and last of a STORY is the same as its beginning, middle, & end! We drew the beginning, middle, and end of stories and explained them in words individually. We also discussed both the internal and external characteristics of characters and drew characters to represent both what they look like and how they feel or act in a story. Finally, we described what the setting of a story is and both drew and described settings of some of our favorite fairy tales! While I don't have pictures of all of the amazing activities and creations that we made as we learned about story elements, I do have links to a few of our favorite songs from the unit that I will post below!  Why I Transitioned from Story Elements to Compare and Contrast... I didn't see why I should teach comparing and contrasting first during my 2 weeks when students wouldn't have the vocabulary and understanding of WHAT they would be comparing in stories until after we had really gotten to know the main story elements of every story! So once we had gotten to that point, we talked about finding similarities and differences before learning the words "compare" and "contrast" and working with the Venn Diagram. I have even MORE videos and songs that I loved for you below! (I know, I post so many, but I just love using song, dance, and videos to get kids excited about what we are learning! It's a great way to start the new lesson each day in a fun way and to remind students what we were working on the day before! It only takes a few times for kids to be singing and dancing along, and then they can ALWAYS refer to that song to remember the facts that they need to know! Students are all different kinds of learners so songs, dances, and videos can really help visual, auditory, and kinesthetic learners.) Time for the fun part.... FAIRYTALE CRAFTS (that incorporate math and science!!!!!!)
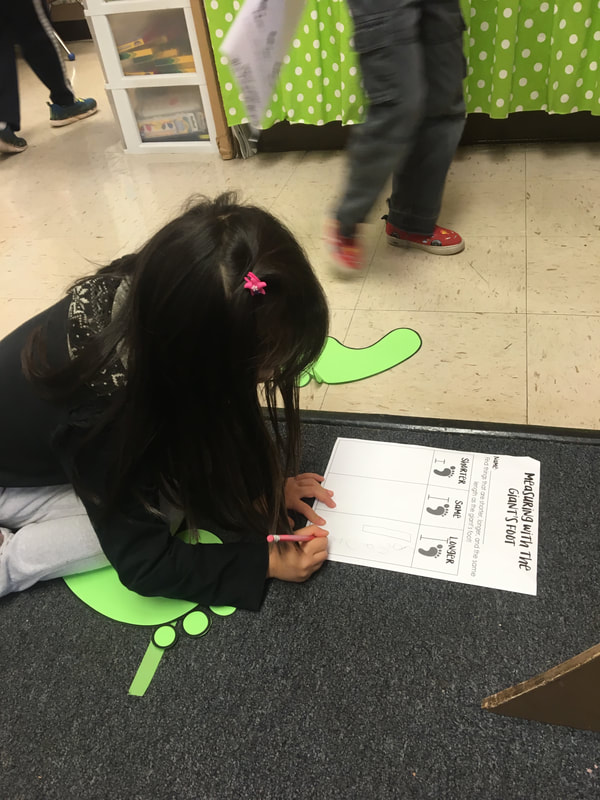
For The Princess and the Pea, we made our own princesses and counted how many mattresses she slept on that she could still feel the pea underneath!   For Rapunzel, we made our own Rapunzels up in a tower. We used cubes to measure how long RAPUNZEL'S hair was and how long OUR OWN hair was! We then had to decide if our hair was longer or shorter than Rapunzel's based on how many cubes long each was.  We had a LOT of Jack and the Beanstalk activities and they were all amazing! First, we planted our own magic beans! We talked about what our beans would need to grow and we recorded their growth for several weeks following when we planted them. Some grew way above the giant's castle in the clouds, which was so much fun! If you want to use the same Growth Record Sheet that we used, you can find it on my TeachersPayTeachers at the link below! We then had a surprise visit from the GIANT HIMSELF!!!!!!!! (The best part of this super fun math/compare & contrast activity is that no one ever got loud because we had to sneak around, whisper, and be very quiet so that we didn't wake up the giant and have him come back, haha!) 
Everyone had their own giant foot to take around the room to compare to objects! We had to compare the foot to things around the room and decide if those objects were shorter, longer, or the same length as the giant's foot! Students could draw or write the objects they found. They LOVED IT! This was truly one of my favorite parts of fairy tales.
 During my internship in the fall of 2017, I was given a challenge: to plan a 2 week thematic unit on an animal that we could make in a life-size form WITH its habitat. The even more difficult part? This was the first animal thematic unit of the year! I started my internship in a kindergarten classroom in August of 2017. We quickly dove into learning about daily procedures, building independent work and reading stamina, learning the ABC's, and introducing more and more of the routines for the rest of the year. As fall approached, we began our first theme: the seasons (specifically fall) for the month of September. In October, we learned all about pumpkins for the entire month! These themes made sense with the time of the year and lasted for the duration of almost an entire month. As it came time for my full 2 weeks of teaching, Mrs. Kimbrell, my cooperating teacher, told me about how they typically do theme for most of the year. Every 2 weeks the class has a different animal thematic unit. They learn all about that animal, while doing explorations, reading books, watching videos, and even creating the animal and its habitat! I would be doing the first animal of the year, so I chose BEES! I figured the bee and a beehive would be reasonable enough to build life-size versions of as I tackled my very first animal unit, and I thought I could tie in compare and contrast, which I was focusing on towards the end of my 2 weeks in reading, when discussing the differences between the two main types of bees we all know and love: the honeybee and the bumble bee. The first thing I did was play a fun song with bees and read a fictional story about bees to get kids excited for our unit, and then I dove right in with my KWL chart (pictured above)! I asked every student to come up to me one-by-one during centers or nap time to tell me one thing that they already knew about bees. I also asked them what they wanted to know at a later date. Throughout the 2 weeks, I read several different books about bees and showed different songs and videos about bees as well. As we learned, we filled out the last part of our KWL chart!  Next, every student got to sign up for a "Construction Crew" for building our bees and beehive! We read books, watched videos, and added information to our KWL daily, but these crews got to meet with me one-on-one throughout the 2 weeks to help execute our final product! It was so much fun!  The Design Crew The Design Crew helped to decide what shapes and colors we should use and all of the parts of a bees' body that we needed to incorporate. They also brainstormed different things that we could actually use to build the hive and honeybees that could work! 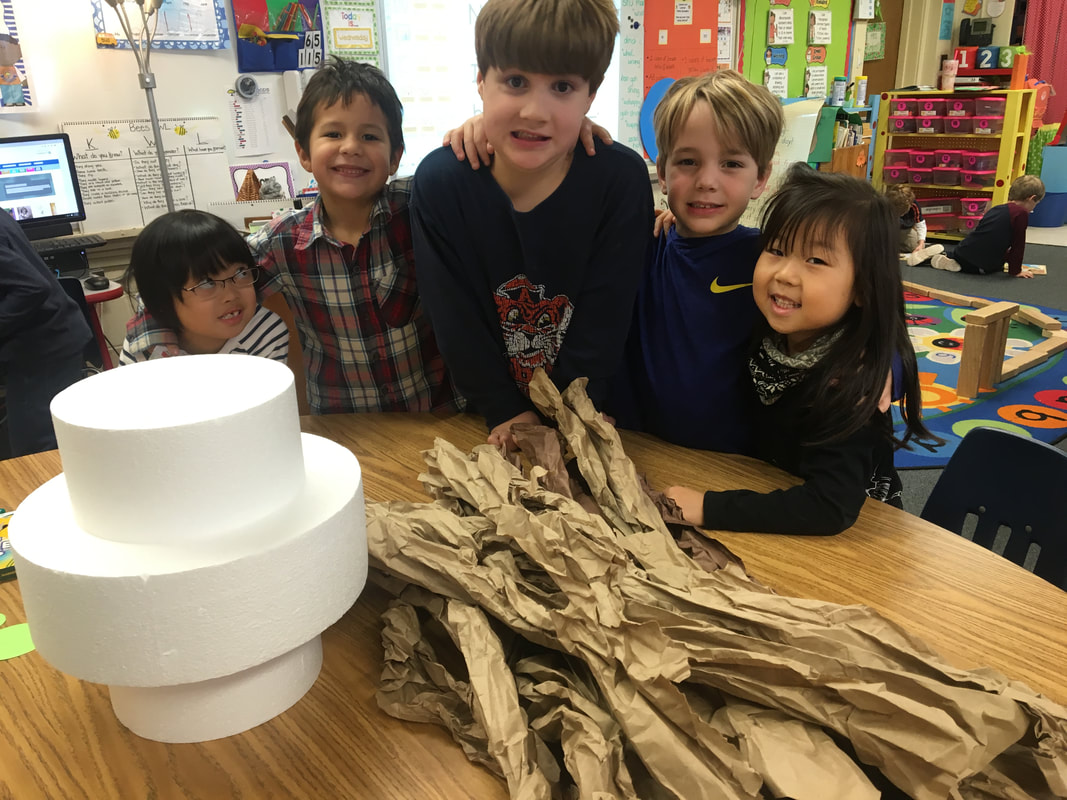 The Habitat Construction Crew The Habitat Construction Crew took all of the materials suggested by the Design Crew to put the hive together! They helped me assemble and glue the foam pieces for the hive and rolled up strips of brown butcher paper for us to cover the hive with! They also supervised the gluing of the butcher paper to the hive (I did the actual gluing myself since it was hot glue and we did not want any tiny fingers injured in the process of building this hive).  The Habitat Decorating Crew The Habitat Decorating Crew got the great privilege of painting the beehive yellow! Trust me, everyone was jealous of this job. They decided not to cover all of the brown with yellow, since some beehives just look brown. They did an amazing job!
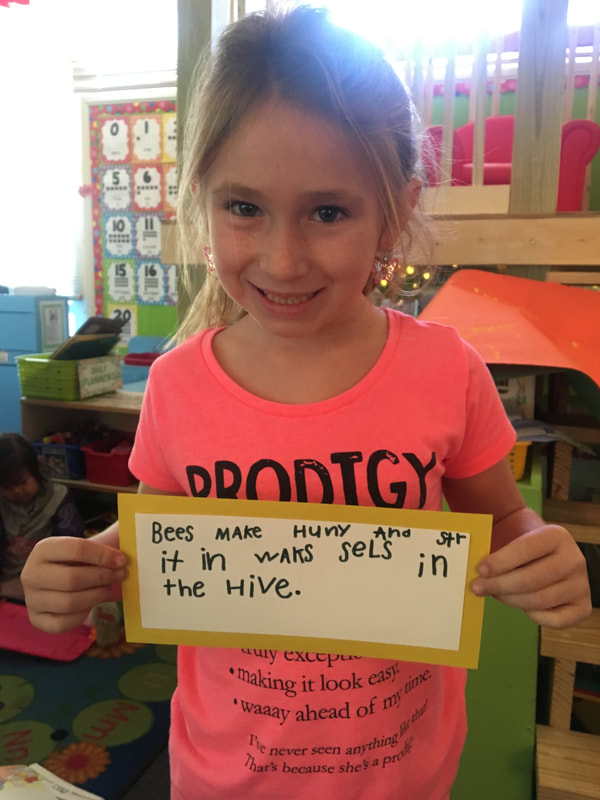
The Writing Crew The Writing Crew got together to come up with facts to write about honeybees to hang next to our beehive. Individually, I worked with each of them to help them sound out their words as best as we could phonetically. I traced over their writing with a black marker for it to show up better when hanging up high. They thought up some wonderful facts! (From Left to Right) 1. Bees get nectar from flowers and throw it up in other bees' mouths. 2. When bees drink nectar, they store it in their honey stomach. 3. Bees live in a hive to stay safe. 4. Bees make honey and store it in wax cells in the hive. 5. Worker bees can only sting 1 time before they die.
We each individually made our own honey bees! Everyone got a yellow and a black pipe cleaner. We twisted them together and then twisted those around a pencil! We used mini sticky googly eyes for the eyes and tissue paper for the four wings!  Patterns, Honey, and Bees We tied in math by making pattern bracelets that depended on our answer to this question: Have you ever tried honey before? If students said "no", they had to make an AB pattern bracelet with yellow and black beads. If students said "yes", they had to make an ABC pattern bracelet with yellow, black, and white beads. We then all got together to compare and contrast the difference between our two kinds of bracelets, which also connected our knowledge from our reading focus that week! Finally, we all TASTED honey!!! Eep! Almost everyone loved it!  More Compare and Contrast We continued to learn about bees and comparing and contrasting by comparing and contrasting Honey Bees and Bumble Bees (pictured above)! I wish I could share EVERYTHING that we did in the classroom to learn about bees and to tie it into our other curriculum, but honestly there just isn't enough time or pictures taken to do it justice! I hope you've gotten a small idea of this fun unit, however! I've left links to some of the videos I used above for your enjoyment and/or use!
|


 RSS Feed
